
GitLab SaaS について
GitLab には自前で構築する GitLab CE と SaaS があります。
私は無料で多機能な GitLab SaaS をお勧めします。多機能なリソースを SaaS に任せられるのが魅力です。
Kubernetes の CI/CD 設定について紹介します。
まずは GitLab SaaS にアカウントを登録します。30日間の無料トライアルもありますので活用ください。
official
https://about.gitlab.com
trial
https://about.gitlab.com/free-trial/
GitLab SaaS はプロジェクト管理・コード管理・パッケージ管理・レジストリ管理・ CI/CD などの開発に必要な機能が備わっています。ただし CI/CD のリソースの部分についてはオンプレミス、クラウド、もしくは共有型の GitLab SaaS で行う必要があります。 インストールについては gitlab-runner を構成する設定ファイルを作成し、それを元に Helm を実行します。
GitLab Runner Helm Chart(Kubernetes Executer)
GitLab Runner の設定ファイル values.yaml を作成
cat コマンドで values.yamlを作成します。コメントアウトしている個所を環境に合わせて修正してください。設定ファイルは ARM64 環境を想定して作っています。token は [設定] -> [CI/CD] -> [Runner] -> [Specific runners] から確認できます。
cat <<EOF > ./values.yaml
image: gitlab/gitlab-runner:ubuntu
imagePullPolicy: IfNotPresent
replicas: 3
gitlabUrl: https://gitlab.com/
runnerRegistrationToken: "runnner-registration-token"  # 修正
terminationGracePeriodSeconds: 3600
concurrent: 10
checkInterval: 30
rbac:
  create: false
  rules: []
  clusterWideAccess: false
  podSecurityPolicy:
    enabled: false
    resourceNames:
    - gitlab-runner
metrics:
  enabled: true
runners:
  executor: kubernetes
  image: ubuntu:18.04
  requestConcurrency: 5
  tags: "arm64" # 修正
  protected: true
  privileged: false
  secret: gitlab-runner-secret
  namespace: gitlab
  pollTimeout: 180
  cache: {}
  builds:
    cpuRequests: 100m
    memoryRequests: 128Mi
  services:
    cpuRequests: 100m
    memoryRequests: 128Mi
  helpers:
    cpuLimit: 200m
    memoryLimit: 256Mi
    cpuRequests: 100m
    memoryRequests: 128Mi
    image: "gitlab/gitlab-runner-helper:arm64-${CI_RUNNER_REVISION}" # 修正
securityContext:
  runAsUser: 999
  fsGroup: 999
resources: {}
affinity:
  podAntiAffinity:
    requiredDuringSchedulingIgnoredDuringExecution:
    - labelSelector:
        matchExpressions:
        - key: domain
          operator: In
          values:
          - gitlab.com
      topologyKey: "kubernetes.io/hostname"
nodeSelector: {}
tolerations: []
hostAliases:
  - ip: "192.168.1.101" # 修正
    hostnames:
    - "node1"
  - ip: "192.168.1.102" # 修正
    hostnames:
    - "node2"
  - ip: "192.168.1.103" # 修正
    hostnames:
    - "node3"
podAnnotations: {}
podLabels:
  environment : development
  domain: gitlab.com
secrets: []
configMaps: {}
EOF
NameSpaceを作成
ネームスペースを作成します。
cat <<EOF > ./namespace.yaml
apiVersion: v1
kind: Namespace
metadata:
  name: gitlab
EOF
Helm install (GitLabHelmリポジトリを追加)
helm repo add gitlab https://charts.gitlab.ioHelm install (設定ファイルから gitlab runner 構成)
helm install --namespace gitlab gitlab-runner -f values.yaml gitlab/gitlab-runnergitlab-ci.yaml
gitlab-ci.yaml は gitlab プロジェクトのルートディレクトリに配置することで機能します。簡単なサンプルになりますが、gitlab-ci.yaml の設定について説明します。ジョブのシナリオは build test deploy としています。 「 build 」 で Kaniko コンテナを利用して、Kubernetes Cluster 内でコンテナをビルドし GitLab Registry に push しています。「 test 」で build したコンテナを確認し、「 deploy 」 で アプリケーションを Kubernetes Cluster に deploy し確認を行います。master ブランチ以外でのマージリクエストをトリガーに staging 環境で build test deploy を行い、問題がなければ production 環境に進みます。
variables:
  KUBERNETES_NAMESPACE_OVERWRITE: ci-${CI_COMMIT_REF_SLUG}

### other branch ###

stages:
  - build
  - test
  - deploy

build to staging:
  stage: build
  except:
    - master
  tags:
    - arm64
  image:
    name: gcr.io/kaniko-project/executor:debug
    entrypoint: [""]
  script:
    - echo "{\"auths\":{\"$CI_REGISTRY\":{\"username\":\"$CI_REGISTRY_USER\",\"password\":\"$CI_REGISTRY_PASSWORD\"}}}" > /kaniko/.docker/config.json
    - /kaniko/executor --context $CI_PROJECT_DIR --dockerfile $CI_PROJECT_DIR/Docker/DockerFile/wordpress/Dockerfile --destination $CI_REGISTRY_IMAGE/wordpress:$CI_COMMIT_TAG
    - /kaniko/executor --context $CI_PROJECT_DIR --dockerfile $CI_PROJECT_DIR/Docker/DockerFile/mariadb/Dockerfile --destination $CI_REGISTRY_IMAGE/mariadb:$CI_COMMIT_TAG
  environment:
   name: staging

Frontend to staging:
  stage: test
  except:
    - master
  image: registry.gitlab.com/username/projectname/wordpress:test
  tags:
    - arm64
  script:
    - ls -la /var/www/html

Backend to staging:
  image: registry.gitlab.com/username/projectname/mariadb:test
  stage: test
  except:
    - master
  tags:
    - arm64
  script:
    - ls -l /var/lib/mysql

deploy to staging:
  stage: deploy
  image: registry.gitlab.com/username/projectname/kubectl:stateless
  except:
    - master
  tags:
    - arm64
  script:
    - which kubectl
    - kubectl get node
    - kubectl get all -A -o wide
  environment:
    name: staging
    url: http://192.168.1.50

### master branch ###

build to production:
  stage: build
  only:
    - master
  tags:
    - arm64
  image:
    name: gcr.io/kaniko-project/executor:debug
    entrypoint: [""]
  script:
    - echo "{\"auths\":{\"$CI_REGISTRY\":{\"username\":\"$CI_REGISTRY_USER\",\"password\":\"$CI_REGISTRY_PASSWORD\"}}}" > /kaniko/.docker/config.json
    - /kaniko/executor --context $CI_PROJECT_DIR --dockerfile $CI_PROJECT_DIR/Docker/DockerFile/wordpress/Dockerfile --destination $CI_REGISTRY_IMAGE/wordpress:$CI_COMMIT_TAG
    - /kaniko/executor --context $CI_PROJECT_DIR --dockerfile $CI_PROJECT_DIR/Docker/DockerFile/mariadb/Dockerfile --destination $CI_REGISTRY_IMAGE/mariadb:$CI_COMMIT_TAG
  environment:
    name: production

Frontend to production:
  stage: test
  only:
    - master
  image: registry.gitlab.com/username/projectname/wordpress:prod
  tags:
    - arm64
  script:
    - ls -la /var/www/html

Backend to production:
  stage: test
  only:
    - master
  image: registry.gitlab.com/username/projectname/mariadb:prod
  tags:
    - arm64
  script:
    - ls -l /var/lib/mysql

deploy to production:
  image: registry.gitlab.com/username/projectname/kubectl:debian
  stage: deploy
  only:
    - master
  tags:
    - arm64
  script:
    - kubectl config view
    - kubectl config get-clusters
    - kubectl get all -A -o wide
  environment:
    name: production
    url: http://192.168.1.51
CI/CD の変数設定について
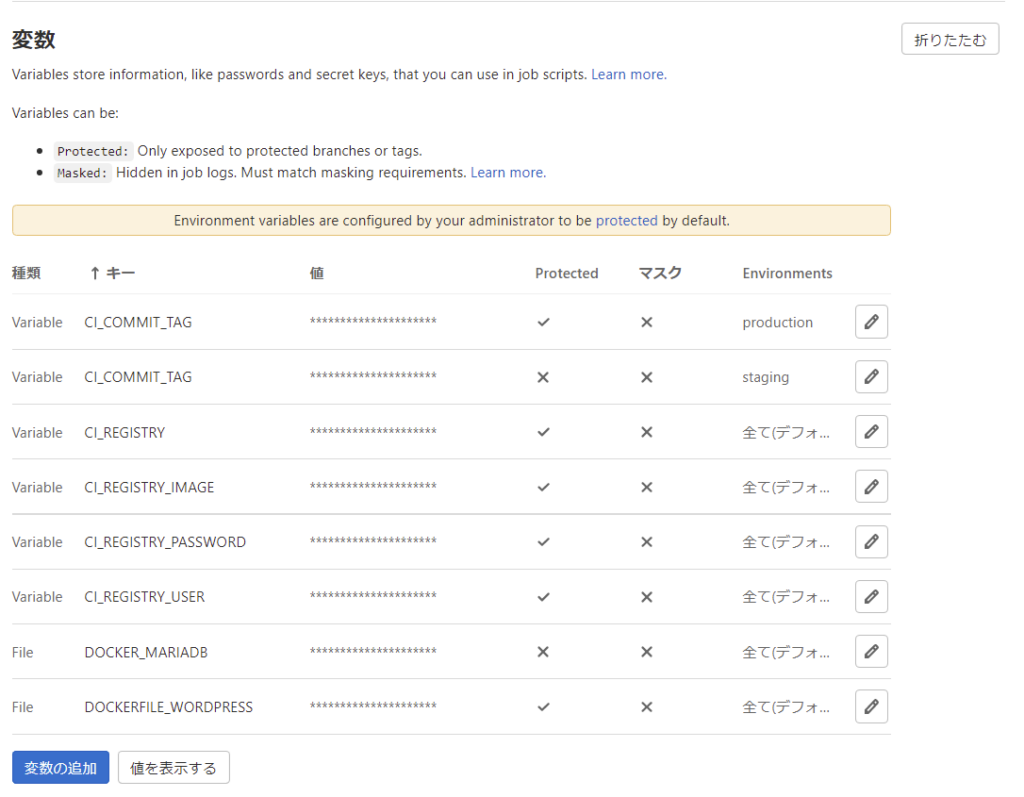
gitlab-ci.yaml に記載している変数は GitLab の Web から設定できます。設定場所は [設定] -> [CI/CD] -> [変数] -> [展開] から [変数の追加] で変数を追加きます。
GitLab SaaS は無料で利用でき、Kubernetes Docker などのいろいろなプラットフォームに対応しています。また、GCP とパートナーシップが結ばれており、 GitLab のコンソールから Kubernetes Cluster のプロダクトとシームレスに連携できます。 さらに Auto DevOps といったセキュリティテスト、パフォーマンステスト、コード品質テスト、ライセンス問題を自動で行うサービスもあります。これが SaaS で提供され無料というのは本当に良いサービスだと思います。